(What else was I going to work on ??)
While I realize that this doesn't look like the series of buildings I promised you, I have been hard at work!
 |
| Test section of the Zagros Pipeline to New Herat |
Did I mention I was going to build a pipeline for my village? I didn't? Hmmmm...
Okay, so I got sidetracked in the hardware store! (It can happen to all of us!)
While looking for some small piping or valves in the irrigation section, I made the mistake of looking over at the 1/2" pipe fittings section. Once I dug through a few bins I suddenly NEEDED to build a Promethium Pipe network for my table. (Not really... but it is as good an excuse as any!)
 |
| Sanding off the lettering |
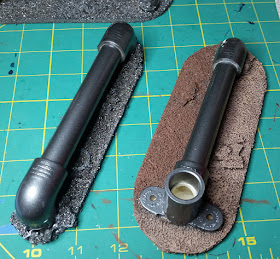
If you want to remove all traces of the 20th century from your PVC pipe fittings, I recommend you go outside to sand them off. I used about 120grit sandpaper on an angled hand-block, but in hindsight should have just used the detail sander with the same grit! You don't have to destroy all of the writing, just knock the top layer off so that it is blurred and unreadable. I made the base 1.5 inches wide for the narrowest pipes and 2.5 inches wide for the ones with the "bases" on them. Using a french curve, I put a curved edge on the base so that the cork wouldn't break up too bad. In hindsight I should have just based these on MDF, but I was having too much fun working with cork at the time!
 |
| completed and sprayed long sections |
The length of the GW Promethium Pipe network is (according to the internet):
- 3 sections - 7 inches long
- 5 sections - 2 inches long
(and when putting on the battlefield it is 3 long sections and 4 short)
So when I set out to build mine, I decided to make the entire pipe, including the fitting heading into the ground 7 inches long. Instead of 4 short sections, I opted to make one longer 8 inch part to take the place of the 4 2-inch sections. Unless most people are building a pipeline with strange branches, etc, I decided that one long section to replace the 4 smaller ones would be acceptable.
 |
| Base showing Brown Oxide and Territorial Beige drybrush |
I broke up some of the trimmed-off cork and attempted to build up chunks of dried out earth around the places where pipes entered the "ground". This at least covered up the junction with the bottom of the base, but I'm not sure how good it will look at the end. The pipes were sprayed with a Hammered Iron spray paint that gives a pretty good look overall. Next time I'll spray the pipes separately! (oops!) Color scheme for the base was the same as the cork house I just built last week. Craft paints in the following layers:
- Base of Brown Oxide
- Drybrush Territorial Beige
- Drybrush Khaki
 |
| Base showing Territorial Beige drybrush and Khaki drybrush |
And I'll remind you that these are craft paints, so it is probably worth it to thin the base coat so it soaks into the crevices well. This will mean two coats of the Brown Oxide, but it will make a more even basecoat (without silver showing through to much!). Drybrushing the layers of Territorial Beige and Khaki over the base gave it a lot more depth, but it still is lacking something. I may put some short dry grass tufts in places as this is supposed to be terrain from a high desert plateau.
Overall, the first test piece has come out great as it was designed to be a CHEAP way to get a Promethium Pipe network on the board. The pipes and fittings probably cost $5 total, and I used one sheet of cork for the bases. Not bad instead of $32 for the GW ones... and who wants spikes and gothic details on their pipelines, anyway??
 |
| NO THANK YOU!! |


No comments:
Post a Comment